The TL;DR: install the WP REST Cache plugin, then install wp-oembed to reduce the impact from federated servers like those running Mastodon and ActivityPub.
Clients using a social network can preload a linked page to display a preview of the site. In a centralized network, the preview is loaded and cached by a centralized hub then distributed to clients. This generates one request to the linked server (possibly more than one if the hub is geographically distributed, but still not a large number).
In a federated network, there are thousands of servers/instances. These servers don’t share a centralized cache, so each one of them that needs a preview will make a request to the link target. Because the post is rapidly shared between servers, the result is a sudden spike in requests for a preview. This load is sufficient to disrupt a shared hosting account, or even a small VPS. Even after bumping the number of available database connections, my little VPS is running out and throwing errors instead of previews. Not good.
There is a great plugin that helps with this, WP REST Cache, and I highly recommend installing it. But it stores cached pages in the database. This the request still has to load WP, and connect to the database before sending the cached file. That’s not helping with the database connection bottleneck.
To solve this problem, I wrote wp-oembed. This is a basic file cache that doesn’t need a database connection. Unlike WP REST Cache, it’s deliberately designed to be quick and unsophisticated. Through a simple rewrite rule the site’s .htaccess file, embed requests are directed to oembed.php. This code checks for an unexpired cached copy in the file system. If present, the file is returned. If not, the file is requested from WP, then cached. Setup is pretty straightforward and explained in the repository’s readme file (which echoes some of the above).
In a couple of tests, it has performed quite well. I expect the real test will be watching how my server responds to me sharing this post on Mastodon!
Having just gone through some trouble trying to get a decent, fully responsive, non-trivial table working in Laravel Livewire, I figured I’d share. This code is available on GitHub as Laravel Livewire Paginated Table. Feel free to use and adapt.
First set up a project with breeze. I’m assuming you’re familiar with this process. If this is new, there are lots of other resources available to help. Replace “myproject” with your project name:
composer create-project laravel/laravel myproject
cd myproject
composer require laravel/breeze --dev
php artisan breeze:install livewire-functional
npm run dev
Next, we’ll create a table to hold the data and a factory to generate test data.
php artisan make:model -mc Part
php artisan make:factory PartFactory
In practice, the data in our table would probably be the result of a join and some computation but for the purposes of this example, I’m just going to mirror the columns in the table. Our migration for creating the parts table will look like this:
    public function up(): void
    {
        Schema::create('parts', function (Blueprint $table) {
            $table->id();
            $table->string('partNumber');
            $table->text('partDescription');
            $table->string('vendorNumber');
            $table->string('vendorName');
            $table->integer('orderQuantity');
            $table->integer('receiveQuantity');
            $table->decimal('cost');
            $table->decimal('extendedCost');
            $table->decimal('dutyPct');
            $table->decimal('duty');
            $table->decimal('freightPct');
            $table->decimal('freight');
            $table->string('uom');
            $table->string('vendorPart');
        });
    }
While we’re at it, set up the factory to generate sample data.
I tried to embed pagination inside a view-component and got nowhere. What worked for me was creating a component-component. In other words, I separated the component code from the view. While we’re here, I added some methods to populate and clear the table.
<?php

namespace App\Livewire;

use App\Models\Part;
use Livewire\Component;
use Livewire\WithPagination;

class PartList extends Component
{
    use WithPagination;

    public function populate(int $count)
    {
        Part::factory($count)->create();
        return redirect()->to('/');
    }

    public function purge()
    {
        Part::truncate();
        return redirect()->to('/');
    }

    public function render()
    {
        return view('livewire.parts.list', ['parts' => Part::orderBy('partNumber')->paginate(10)]);
    }
}
Making the CSS Mobile First
Nakayama’s CSS has a desktop first orientation. My first step was to reorganize it to be mobile-first, as a precursor to making it actually use Tailwind’s utility classes.
@tailwind base;
@tailwind components;
@tailwind utilities;

@layer components {
    /* Mobile first styles, extra small display, single column originally up to 580px */
    /* Now small display: up to 639px */
    ol.collection {
        margin: 0;
        padding: 0;
    }

    li {
        list-style: none;
    }

    ol.collection * {
        box-sizing: border-box;
    }

    .item {
        border: 1px solid gray;
        border-radius: 2px;
        padding: 10px;
    }

    /* Don't display the first item, since it is used to display the header for tabular layouts*/
    .collection-container > li:first-child {
        display: none;
    }

    .attribute::before {
        content: attr(data-name);
    }

    /* Attribute name for first column, and attribute value for second column. */
    .attribute {
        display: grid;
        grid-template-columns: minmax(9em, 30%) 1fr;
    }

    .collection-container {
        display: grid;
        grid-template-columns: 1fr;
        grid-gap: 20px;
    }

    @media (min-width: 640px) {
        /* Mobile first styles, small display, dual column originally 581px to 736px */
        /* Now medium 640px up to 767px */
        .collection-container {
            display: grid;
            grid-template-columns: 1fr 1fr;
            grid-gap: 20px;
        }

    }

    @media (min-width: 768px) {
        /* Mobile first styles, medium display, table originally 737px and up */
        /* Now 768 and up */

        .attribute::before {
            content: none;
        }

        /* Show the first item, since it is used to display the header for tabular layouts*/
        .collection-container > li:first-child {
            display: grid;
        }

        .item {
            border: none;
            padding: 0;
        }

        /* The maximum column width, that can wrap */
        .item-container {
            display: grid;
            grid-template-columns: 2em 2em 10fr 2fr 2fr 2fr 2fr 4em 6em;
        }

        .attribute-container {
            display: grid;
            grid-template-columns: repeat(auto-fit, minmax(var(--column-width-min), 1fr));
        }

        /* Definition of wrapping column width for attribute groups. */
        .part-information {
            --column-width-min: 10em;
        }

        .part-id {
            --column-width-min: 10em;
        }

        .vendor-information {
            --column-width-min: 8em;
        }

        .quantity {
            --column-width-min: 5em;
        }

        .cost {
            --column-width-min: 5em;
        }

        .duty {
            --column-width-min: 5em;
        }

        .freight {
            --column-width-min: 5em;
        }

        .collection {
            border-top: 1px solid gray;
            border-left: 1px solid gray;
        }

        /* In order to maximize row lines, only display one line for a cell */
        .attribute {
            border-right: 1px solid gray;
            border-bottom: 1px solid gray;
            display: block;
            grid-template-columns: none;
            padding: 2px;
            overflow: hidden;
            white-space: nowrap;
            text-overflow: ellipsis;
        }

        .collection-container > .item-container:first-child {
            background-color: blanchedalmond;
        }

        .item-container:hover {
            background-color: rgb(200, 227, 252);
        }

        .collection-container {
            grid-template-columns: none;
            grid-gap: 0;
        }

        /* Center header labels */
        .collection-container > .item-container:first-child .attribute {
            display: flex;
            align-items: center;
            justify-content: center;
            text-overflow: initial;
            overflow: auto;
            white-space: normal;
        }


    }
}
To test this, I copied the <section> from Nakayama’s HTML and dropped it into the view.
<section>
  <ol class="collection collection-container">
    <!-- Copied sample table data here -->
  </ol>
</section>
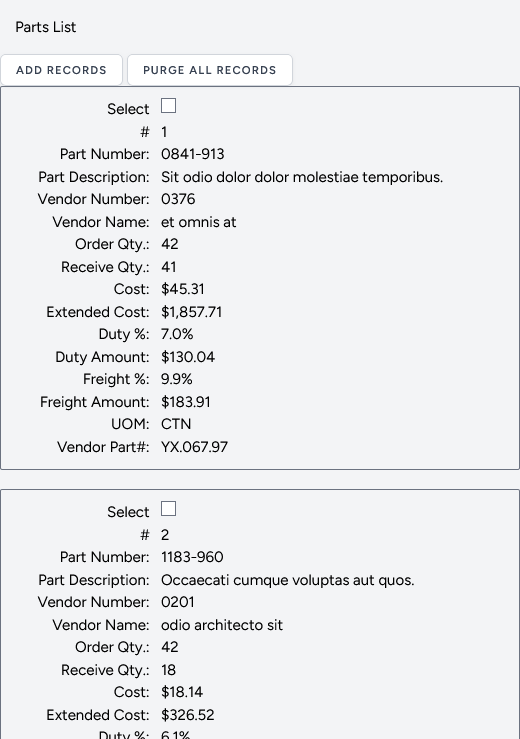
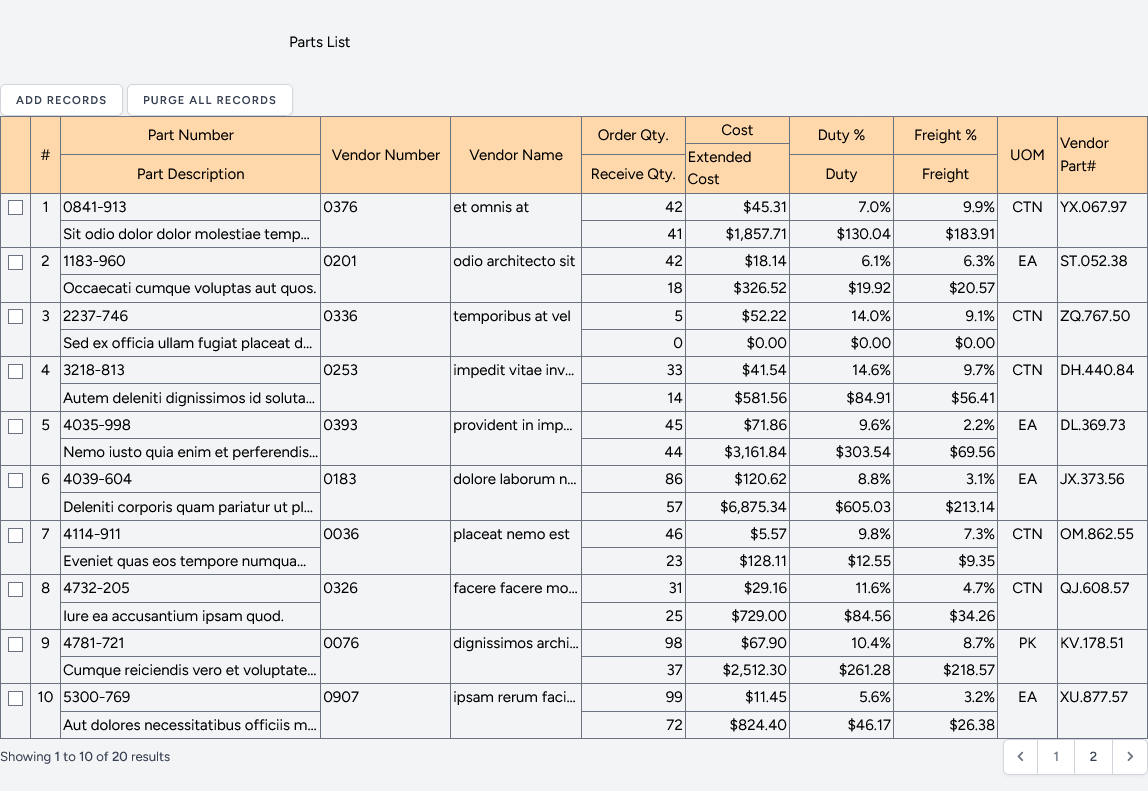
Time to add a couple of buttons to manage the table, loop through the data and add pagination.
<section>
    <x-secondary-button wire:click="populate(10)">Add records</x-secondary-button>
    <x-secondary-button wire:click="purge">Purge All Records</x-secondary-button>
    @if(count($parts))
        <ol class="collection collection-container">
            <!-- The first list item is the header of the table -->
            <li class="item item-container">
                <div class="attribute"></div>
                <div class="attribute" data-name="#">#</div>
                <!-- Enclose semantically similar attributes as a div hierarchy -->
                <div class="attribute-container part-information">
                    <div class="attribute-container part-id">
                        <div class="attribute" data-name="Part Number">Part Number</div>
                        <div class="attribute" data-name="Part Description">Part Description</div>
                    </div>
                    <div class="attribute-container vendor-information">
                        <div class="attribute">Vendor Number</div>
                        <div class="attribute">Vendor Name</div>
                    </div>
                </div>
                <div class="attribute-container quantity">
                    <div class="attribute">Order Qty.</div>
                    <div class="attribute">Receive Qty.</div>
                </div>
                <div class="attribute-container cost">
                    <div class="attribute">Cost</div>
                    <div class="attribute">Extended Cost</div>
                </div>
                <div class="attribute-container duty">
                    <div class="attribute">Duty %</div>
                    <div class="attribute">Duty</div>
                </div>
                <div class="attribute-container freight">
                    <div class="attribute">Freight %</div>
                    <div class="attribute">Freight</div>
                </div>
                <div class="attribute">UOM</div>
                <div class="attribute">Vendor Part Number</div>
            </li>
            <!-- The rest of the items in the list are the actual data -->
            @foreach ($parts as $part)
                <li class="item item-container" wire:key="{{ $part->id }}">
                    <div class="attribute" data-name="Select"><input type="checkbox" name="" id="{{ $part->id }}"></div>
                    <div class="attribute" data-name="#">{{ $loop->index + 1 }}</div>
                    <div class="attribute-container part-information">
                        <div class="attribute-container part-id">
                            <div class="attribute" data-name="Part Number">{{ $part->partNumber }}</div>
                            <div class="attribute" data-name="Part Description">{{ $part->partDescription }}</div>
                        </div>
                        <div class="attribute-container vendor-information">
                            <div class="attribute" data-name="Vendor Number">{{ $part->vendorNumber }}</div>
                            <div class="attribute" data-name="Vendor Name">{{ $part->vendorName }}</div>
                        </div>
                    </div>
                    <div class="attribute-container quantity">
                        <div class="attribute" data-name="Order Qty">{{ $part->orderQuantity }}</div>
                        <div class="attribute" data-name="Receive Qty">{{ $part->receiveQuantity }}</div>
                    </div>
                    <div class="attribute-container cost">
                        <div class="attribute" data-name="Cost">${{ number_format($part->cost, 2) }}</div>
                        <div class="attribute" data-name="Extended Cost">
                            ${{ number_format($part->extendedCost, 2) }}</div>
                    </div>
                    <div class="attribute-container duty">
                        <div class="attribute" data-name="Duty %">{{ number_format($part->dutyPct, 1) }}%</div>
                        <div class="attribute" data-name="Duty">${{ number_format($part->duty, 2) }}</div>
                    </div>
                    <div class="attribute-container freight">
                        <div class="attribute" data-name="Freight %">{{ number_format($part->freightPct, 1) }}%</div>
                        <div class="attribute" data-name="Freight">${{ number_format($part->freight, 2) }}</div>
                    </div>
                    <div class="attribute" data-name="UOM">{{ $part->uom }}</div>
                    <div class="attribute" data-name="Vendor Part Number">{{ $part->vendorPart }}</div>
                </li>
            @endforeach
        </ol>
    @else
        <p>There are no parts in the table.</p>
    @endif
    {{ $parts->links() }}
</section>
“Tailwindifying” the CSS
Right now we have a working solution, and we could call it done. But merely dumping our custom CSS into utilities isn’t exactly Tailwind native, and these styles also belong in the components layer, so let’s fix all that. Note that some of the colours changed slightly so we can use those provided by Tailwind. There are also a few tweaks for alignment, which will show up soon.
@tailwind base;
@tailwind components;
@tailwind utilities;

@layer components {
    /* Mobile first styles, extra small display, single column originally up to 580px */
    /* Now small display: up to 639px */
    ol.collection {
        @apply m-0 p-0;
    }

    li {
        @apply list-none;
    }

    ol.collection * {
        @apply box-border;
    }

    .item {
        @apply border border-gray-500 p-3 rounded-sm;
    }

    /* Don't display the first item, since it is used to display the header for tabular layouts*/
    .collection-container > li:first-child {
        @apply hidden;
    }

    .attribute::before {
        @apply content-[attr(data-name)] text-end pr-3;
    }

    /* Attribute name for first column, and attribute value for second column. */
    .attribute {
        @apply grid grid-cols-[minmax(9em,30%)_1fr];
    }

    .collection-container {
        @apply grid gap-5 grid-cols-1;
    }

    @media (min-width: 640px) {
        /* Mobile first styles, small display, dual column originally 581px to 736px */
        /* Now medium 640px up to 767px */
        .collection-container {
            @apply grid gap-5 grid-cols-2;
        }

    }

    @media (min-width: 768px) {
        /* Mobile first styles, medium display, table originally 737px and up */
        /* Now 768 and up */

        .attribute::before {
            @apply content-none;
        }

        /* Show the first item, since it is used to display the header for tabular layouts*/
        .collection-container > li:first-child {
            @apply grid;
        }

        .item {
            @apply border-0 p-0;
        }

        /* The maximum column width, that can wrap */
        .item-container {
            @apply grid grid-cols-[2em_2em_10fr_2fr_2fr_2fr_2fr_4em_6em];
        }

        .attribute-container {
            @apply grid grid-cols-[repeat(auto-fit,minmax(var(--column-width-min),1fr))];
        }

        /* Definition of wrapping column width for attribute groups. */
        .part-information {
            --column-width-min: 10em;
        }

        .part-id {
            --column-width-min: 10em;
        }

        .vendor-information {
            --column-width-min: 8em;
        }

        .quantity {
            --column-width-min: 5em;
        }

        .cost {
            --column-width-min: 5em;
        }

        .duty {
            --column-width-min: 5em;
        }

        .freight {
            --column-width-min: 5em;
        }

        .collection {
            @apply border-t border-l border-gray-500;
        }

        /* In order to maximize row lines, only display one line for a cell */
        .attribute {
            @apply block border-r border-b border-gray-500 grid-cols-none overflow-hidden p-0.5 text-ellipsis whitespace-nowrap;

        }

        .collection-container > .item-container:first-child {
            @apply bg-orange-200;
        }

        .item-container:hover {
            @apply bg-blue-100;
        }

        .collection-container {
            @apply grid-cols-none gap-0;
        }

        /* Center header labels */
        .collection-container > .item-container:first-child .attribute {
            @apply flex items-center justify-center overflow-auto whitespace-normal;
            text-overflow: initial;
        }
    }
}
While we’re at it, let’s make the card view a little nicer and align the columns in the table view:
There’s more that could be done here. For example, some of these constructs could be generalized to make it easier to support multiple tables. If your application has a lot of different tables, that would be the best approach.
A Boeing 747 cockpit, a functional complex interface
Note: This was originally published on a Joomla blog in 2013. The details are outdated, but the principles remain the same.
User Experience (UX) design is an important aspect of almost every software application. Most users benefit from having a simple, easy to understand interface that offers intuitive choices to achieve their goals. Advocates of the simple approach point to surveys that measure how users respond to the design of an application, where simpler interfaces almost always garner a better rating.
The challenge is that not all applications can be reduced to a simple model. The current trend in UX design is to break a complex task down into a set of smaller, simpler interfaces, and then give the user a method of selecting or stepping through each of these interfaces. In some cases where a lot of this input is required, the user is guided through a sequence of simple steps to achieve a complex goal. This doesn’t work. It’s the opposite of the one-step checkout process that works so well for commerce sites, and we need a better solution.
This simplification and the drive for a “clean” user interface has become even more pervasive with the rise of mobile devices. User interfaces are dropping mouse-related functionality and adapting to smaller screen sizes.
While all of this is generally good and something I support, I think we’re losing something important. When we build a single interface designed for the broadest range of users, we leave other users out. The distribution of user requirements isn’t even. Every user base breaks down into clusters based on skills, needs, abilities, and equipment. Every time you tune your UX for one cluster, you run the risk of making it less useful for another cluster.
As a case in point, let’s take the administrator interface for Joomla 3.0. This interface is based on Twitter Bootstrap, which makes it responsive and touch friendly, which is a good thing. But let’s look at it from the perspective of a content creator/manager. After all it’s a CMS:
Menu navigation: In Joomla 2.5, when you hover a mouse cursor over a top level menu item, the submenu automatically appears. In Joomla 3.0, “mouse hover” is not a touch interface concept, so nothing happens. Desktop users just have to click, click, click. While the majority of new devices sold are mobile and touch, I think it’s safe to assume that most web sites will be administered from desktops for some time to come. This is not an improvement.
Article Manager: It’s clean, it’s pretty, it’s missing information. Want to find out how many hits an article has? Edit the article, then go find the right tab. Want to sort by hits to see what content is most popular? Go fish. Sure the control panel has a nice display of most popular articles, complete with a colour scheme that’s supposed to mean something intuitive, but if you want to filter by category you’ll have to find an extension for that.
Article Creation/Editing: Let’s look at the evolution from Joomla 1.5. Joomla 2.5 linearizes the title / category / publishing status fields. While this is useful for tab order (what, users with keyboards?) it creates a pile of white space that crushes the area available for the article. Various other details are retained in the accordion style tabs on the right. While I’m on the accordion tabs, the fact that you can’t open more than one tab at a time still irks me – why can’t I see the author name and the metadata at the same time? Meanwhile in Joomla 3.0 we have the title and category selection above the editor, a much wider edit screen, publishing details in a narrower right column, and image details below the editor. Everything else is now in tabs. Click a tab, the editor is replaced with the fields on the tab. While this is probably great if you’ve got a hobby blog, it’s got a lot of other issues. For me the most significant is that you can no longer see the article when entering the meta description. If you want to get it right, you wind up tabbing back and forth, cobbling it together a few words at a time. Visual simplicity is not user simplicity.
I hope these examples illustrate the point. What works best for the biggest cluster of users probably doesn’t work best for other clusters. It’s common to hear that one of the reasons WordPress is more popular than Joomla is because it has a simpler user interface. So we simplify the Joomla interface to address this, and not only do we have a pile of tabs that will still have users calling it too complex, we make it more difficult for content creators who know what they’re doing. It’s a lose-lose scenario. It’s also not particularly informed by looking at WordPress closely. With a SEO plugin installed, the WP post creation page has all the relevant information displayed at once. No accordion, no tabs. Lots of information in your face at the same time. Where WP has the advantage is that if you don’t care about SEO, it’s just not there. The interface gets more complicated as user requirements get more complex. It’s this scaled functional complexity that’s the key to the positive impression, not some UX magic.
Joomla should be offering configurable interfaces targeted at each user group, so that those of us who run with a huge desktop screen can see everything we need at once – just like the cockpit of a jet aircraft – and at the same time someone with less complicated requirements can have the iPod interface.
Image credit: SWF Photography used under a CC-BY-SA License.
Easily one of the most irritating things about WordPress is the continuous attempts to up-sell in the dashboard. Here’s how to get rid of them.
It’s one thing to have a gentle hint, like Updraft Plus saying “hey you can get more features with the pro version” and a dismiss function that makes the reminder go away for a year. It’s more irritating to have something that pops on every login, and even more irritating to see something show up every time you are on the dashboard.
I can tolerate most of these. Sometimes they’re irritating enough that I just switch plugins, especially when they try pushing related plugins you don’t give a damn about. This is one reason why there’s no Yoast on my sites. The SEO Framework is just as capable, a lot less pedantic, and it doesn’t nag. Yet.
But what to do when there’s no alternative and the plugin is persistently nagging? Use your ad blocker to make it go away! Since it has just recently pissed me off, I’m going to use WPCode Lite, an otherwise useful plugin as the prime example. With a recent update, this plugin has elected to add a widget to the post edit page with the title “WPCode Page Scripts”. Cool! That’s a welcome minor convenience. Click on the widget though and what do you get?
Page Scripts is a Pro Feature
That’s nice, but for me it’s not worth subscribing. How do I dismiss this? Surprise, surprise, I can’t. Well, F*ck you, WPCode! I’ll do it myself. Now this takes a little knowledge of HTML and custom AdBlock Plus rules, but the general process goes like this:
Right click on the widget and choose inspect. This will highlight the general area in the code you want.
Look for the highest level element that uniquely identifies your target widget. In my case, inspect took me to a div with the id “advanced-sortables”. We don’t want that. There are a bunch of useful elements on the page that are enclosed by that. Drill down a bit and we find another div with the id “wpcode-metabox-snippets”. That’s the one!
Click on your AdBlock icon.
Click on the gear to get to settings.
Select the advanced tab from the left.
Scroll down to “Your Custom Filters”.
In the box below “My Filter List”, enter this rule, substituting your domain for mine:
ambitonline.com###wpcode-metabox-snippets
You can also leave off the domain if you have multiple sites, but in my experience more specific rules help prevent long periods of “WTF” until your realize that the ad blocker is doing something you didn’t expect.
I’m picking on WPCode here because the arrogance of this has really ticked me off, but you can apply the same method to most other notices like this. At some point, plugin developers will take defensive measures to make this even more difficult and then we’ll have a discussion about writing user scripts in TamperMonkey and it’s kin.
Anyone writing code has probably seen a bunch of references to Docker by now. It’s like this new toy that’s all the rage, but for people like me — where picking up new things takes a crap-load more work than it used to — the general reaction is “I’ll learn that when it’s unavoidable.” Alas, a few weeks back it became unavoidable, and I’m here to report back.
If you’re even mildly inquisitive, a quick scan of Docker says a lot about containers and it’s pretty obvious that a container is some kind of virtual environment, but there’s not much that tells you why you should give a damn. I’m going to try to fix that. I’m not going to describe how to use Docker here, just what it’s for. There’s lots of great resources on making use of it elsewhere.
If you got into development in a time when your workplace had a nice air-conditioned room with raised floors and racks of servers and keyboard/console switches, then this post is for you.
The TL:DR on this is the learning curve here is a lot less than it seems at first, and the flexibility it gives you to set up and change configurations is truly powerful. Invest a few days in learning the basics and you can build, rebuild, and reconfigure virtual server rooms that significantly reduce the amount of time needed to maintain your own local environment. As a common example, if you’ve ever sworn at LAMP/ XAMP / MAMP configurations only to start from scratch or if you’ve tried to get two versions of just about anything running on the same system, then Docker definitely is for you.
There’s a mouthful. There’s two parts to this post. The first part is the story of how I arrived at using Behat, a tool that facilitates Behavioural Driven Design (BDD). The last part is the TL;DR configuration I used to get it working. If you just want to get this configuration going and don’t care about the background, skip down to it. I won’t be hurt.
First an admission: I’m really, really late to the BDD camp, and it kind of pisses me off. If I’d been using this approach for the past 15 years, there’s no question I would have gotten more done in less time.



Recent Comments