A Non-trivial Paginated Table in Laravel Livewire
Having just gone through some trouble trying to get a decent, fully responsive, non-trivial table working in Laravel Livewire, I figured I’d share. This code is available on GitHub as Laravel Livewire Paginated Table. Feel free to use and adapt.
The goal here is to implement a responsive table that follows the style detailed by Shingo Nakayama at How to create responsive tables with pure CSS using Grid Layout Module. I’ll be adapting their solution along the way.
Setup
First set up a project with breeze. I’m assuming you’re familiar with this process. If this is new, there are lots of other resources available to help. Replace “myproject” with your project name:
composer create-project laravel/laravel myproject
cd myproject
composer require laravel/breeze --dev
php artisan breeze:install livewire-functional
npm run dev
Next, we’ll create a table to hold the data and a factory to generate test data.
php artisan make:model -mc Part
php artisan make:factory PartFactory
In practice, the data in our table would probably be the result of a join and some computation but for the purposes of this example, I’m just going to mirror the columns in the table. Our migration for creating the parts table will look like this:
    public function up(): void
    {
        Schema::create('parts', function (Blueprint $table) {
            $table->id();
            $table->string('partNumber');
            $table->text('partDescription');
            $table->string('vendorNumber');
            $table->string('vendorName');
            $table->integer('orderQuantity');
            $table->integer('receiveQuantity');
            $table->decimal('cost');
            $table->decimal('extendedCost');
            $table->decimal('dutyPct');
            $table->decimal('duty');
            $table->decimal('freightPct');
            $table->decimal('freight');
            $table->string('uom');
            $table->string('vendorPart');
        });
    }
While we’re at it, set up the factory to generate sample data.
<?php

namespace Database\Factories;

use Illuminate\Database\Eloquent\Factories\Factory;

/**
 * @extends \Illuminate\Database\Eloquent\Factories\Factory<\App\Models\Part>
 */
class PartFactory extends Factory
{
    /**
     * Define the model's default state.
     *
     * @return array<string, mixed>
     */
    public function definition(): array
    {
        $orderQuantity = fake()->numberBetween(5, 100);
        $receiveQuantity = fake()->numberBetween(0, $orderQuantity);
        $cost = fake()->randomFloat(2, 0.1, 150.0);
        $extendedCost = $cost * $receiveQuantity;
        $dutyPct = fake()->randomFloat(1, 5.0, 15.0);
        $freightPct = fake()->randomFloat(1, 2.0, 10.0);
        return [
            'partNumber' => fake()->numerify('####-###'),
            'partDescription' => fake()->sentence(5, true),
            'vendorNumber' => fake()->numerify('0###'),
            'vendorName' => fake()->words(3, true),
            'orderQuantity' => $orderQuantity,
            'receiveQuantity' => $receiveQuantity,
            'cost' => $cost,
            'extendedCost' => $extendedCost,
            'dutyPct' => $dutyPct,
            'duty' => round($extendedCost * $dutyPct / 100.0, 2),
            'freightPct' => $freightPct,
            'freight' => round($extendedCost * $freightPct / 100.0, 2),
            'uom' => fake()->randomElement(['EA', 'EA', 'PK', 'BX', 'CTN']),
            'vendorPart' => strtoupper(fake()->bothify('??.###.##')),
        ];
    }

}
Then create the table:
php artisan migrate
Routing
Next, we’ll make our table the home page:
<?php

use Illuminate\Support\Facades\Route;

- Route::view('/', 'welcome');
+ Route::view('/', 'parts');

Route::view('dashboard', 'dashboard')
    ->middleware(['auth', 'verified'])
    ->name('dashboard');

Route::view('profile', 'profile')
    ->middleware(['auth'])
    ->name('profile');

require __DIR__.'/auth.php';
The Livewire Component
I tried to embed pagination inside a view-component and got nowhere. What worked for me was creating a component-component. In other words, I separated the component code from the view. While we’re here, I added some methods to populate and clear the table.
<?php

namespace App\Livewire;

use App\Models\Part;
use Livewire\Component;
use Livewire\WithPagination;

class PartList extends Component
{
    use WithPagination;

    public function populate(int $count)
    {
        Part::factory($count)->create();
        return redirect()->to('/');
    }

    public function purge()
    {
        Part::truncate();
        return redirect()->to('/');
    }

    public function render()
    {
        return view('livewire.parts.list', ['parts' => Part::orderBy('partNumber')->paginate(10)]);
    }
}
Making the CSS Mobile First
Nakayama’s CSS has a desktop first orientation. My first step was to reorganize it to be mobile-first, as a precursor to making it actually use Tailwind’s utility classes.
@tailwind base;
@tailwind components;
@tailwind utilities;

@layer components {
    /* Mobile first styles, extra small display, single column originally up to 580px */
    /* Now small display: up to 639px */
    ol.collection {
        margin: 0;
        padding: 0;
    }

    li {
        list-style: none;
    }

    ol.collection * {
        box-sizing: border-box;
    }

    .item {
        border: 1px solid gray;
        border-radius: 2px;
        padding: 10px;
    }

    /* Don't display the first item, since it is used to display the header for tabular layouts*/
    .collection-container > li:first-child {
        display: none;
    }

    .attribute::before {
        content: attr(data-name);
    }

    /* Attribute name for first column, and attribute value for second column. */
    .attribute {
        display: grid;
        grid-template-columns: minmax(9em, 30%) 1fr;
    }

    .collection-container {
        display: grid;
        grid-template-columns: 1fr;
        grid-gap: 20px;
    }

    @media (min-width: 640px) {
        /* Mobile first styles, small display, dual column originally 581px to 736px */
        /* Now medium 640px up to 767px */
        .collection-container {
            display: grid;
            grid-template-columns: 1fr 1fr;
            grid-gap: 20px;
        }

    }

    @media (min-width: 768px) {
        /* Mobile first styles, medium display, table originally 737px and up */
        /* Now 768 and up */

        .attribute::before {
            content: none;
        }

        /* Show the first item, since it is used to display the header for tabular layouts*/
        .collection-container > li:first-child {
            display: grid;
        }

        .item {
            border: none;
            padding: 0;
        }

        /* The maximum column width, that can wrap */
        .item-container {
            display: grid;
            grid-template-columns: 2em 2em 10fr 2fr 2fr 2fr 2fr 4em 6em;
        }

        .attribute-container {
            display: grid;
            grid-template-columns: repeat(auto-fit, minmax(var(--column-width-min), 1fr));
        }

        /* Definition of wrapping column width for attribute groups. */
        .part-information {
            --column-width-min: 10em;
        }

        .part-id {
            --column-width-min: 10em;
        }

        .vendor-information {
            --column-width-min: 8em;
        }

        .quantity {
            --column-width-min: 5em;
        }

        .cost {
            --column-width-min: 5em;
        }

        .duty {
            --column-width-min: 5em;
        }

        .freight {
            --column-width-min: 5em;
        }

        .collection {
            border-top: 1px solid gray;
            border-left: 1px solid gray;
        }

        /* In order to maximize row lines, only display one line for a cell */
        .attribute {
            border-right: 1px solid gray;
            border-bottom: 1px solid gray;
            display: block;
            grid-template-columns: none;
            padding: 2px;
            overflow: hidden;
            white-space: nowrap;
            text-overflow: ellipsis;
        }

        .collection-container > .item-container:first-child {
            background-color: blanchedalmond;
        }

        .item-container:hover {
            background-color: rgb(200, 227, 252);
        }

        .collection-container {
            grid-template-columns: none;
            grid-gap: 0;
        }

        /* Center header labels */
        .collection-container > .item-container:first-child .attribute {
            display: flex;
            align-items: center;
            justify-content: center;
            text-overflow: initial;
            overflow: auto;
            white-space: normal;
        }


    }
}
To test this, I copied the <section> from Nakayama’s HTML and dropped it into the view.
<section>
  <ol class="collection collection-container">
    <!-- Copied sample table data here -->
  </ol>
</section>
<x-app-layout>
<div class="max-w-2xl mx-auto p-4 sm:p-6 lg:p-8">
Parts List<br>
</div>
<livewire:partList />
</x-app-layout>
Everything works as expected! Good.
Making it Functional
Time to add a couple of buttons to manage the table, loop through the data and add pagination.
<section>
    <x-secondary-button wire:click="populate(10)">Add records</x-secondary-button>
    <x-secondary-button wire:click="purge">Purge All Records</x-secondary-button>
    @if(count($parts))
        <ol class="collection collection-container">
            <!-- The first list item is the header of the table -->
            <li class="item item-container">
                <div class="attribute"></div>
                <div class="attribute" data-name="#">#</div>
                <!-- Enclose semantically similar attributes as a div hierarchy -->
                <div class="attribute-container part-information">
                    <div class="attribute-container part-id">
                        <div class="attribute" data-name="Part Number">Part Number</div>
                        <div class="attribute" data-name="Part Description">Part Description</div>
                    </div>
                    <div class="attribute-container vendor-information">
                        <div class="attribute">Vendor Number</div>
                        <div class="attribute">Vendor Name</div>
                    </div>
                </div>
                <div class="attribute-container quantity">
                    <div class="attribute">Order Qty.</div>
                    <div class="attribute">Receive Qty.</div>
                </div>
                <div class="attribute-container cost">
                    <div class="attribute">Cost</div>
                    <div class="attribute">Extended Cost</div>
                </div>
                <div class="attribute-container duty">
                    <div class="attribute">Duty %</div>
                    <div class="attribute">Duty</div>
                </div>
                <div class="attribute-container freight">
                    <div class="attribute">Freight %</div>
                    <div class="attribute">Freight</div>
                </div>
                <div class="attribute">UOM</div>
                <div class="attribute">Vendor Part Number</div>
            </li>
            <!-- The rest of the items in the list are the actual data -->
            @foreach ($parts as $part)
                <li class="item item-container" wire:key="{{ $part->id }}">
                    <div class="attribute" data-name="Select"><input type="checkbox" name="" id="{{ $part->id }}"></div>
                    <div class="attribute" data-name="#">{{ $loop->index + 1 }}</div>
                    <div class="attribute-container part-information">
                        <div class="attribute-container part-id">
                            <div class="attribute" data-name="Part Number">{{ $part->partNumber }}</div>
                            <div class="attribute" data-name="Part Description">{{ $part->partDescription }}</div>
                        </div>
                        <div class="attribute-container vendor-information">
                            <div class="attribute" data-name="Vendor Number">{{ $part->vendorNumber }}</div>
                            <div class="attribute" data-name="Vendor Name">{{ $part->vendorName }}</div>
                        </div>
                    </div>
                    <div class="attribute-container quantity">
                        <div class="attribute" data-name="Order Qty">{{ $part->orderQuantity }}</div>
                        <div class="attribute" data-name="Receive Qty">{{ $part->receiveQuantity }}</div>
                    </div>
                    <div class="attribute-container cost">
                        <div class="attribute" data-name="Cost">${{ number_format($part->cost, 2) }}</div>
                        <div class="attribute" data-name="Extended Cost">
                            ${{ number_format($part->extendedCost, 2) }}</div>
                    </div>
                    <div class="attribute-container duty">
                        <div class="attribute" data-name="Duty %">{{ number_format($part->dutyPct, 1) }}%</div>
                        <div class="attribute" data-name="Duty">${{ number_format($part->duty, 2) }}</div>
                    </div>
                    <div class="attribute-container freight">
                        <div class="attribute" data-name="Freight %">{{ number_format($part->freightPct, 1) }}%</div>
                        <div class="attribute" data-name="Freight">${{ number_format($part->freight, 2) }}</div>
                    </div>
                    <div class="attribute" data-name="UOM">{{ $part->uom }}</div>
                    <div class="attribute" data-name="Vendor Part Number">{{ $part->vendorPart }}</div>
                </li>
            @endforeach
        </ol>
    @else
        <p>There are no parts in the table.</p>
    @endif
    {{ $parts->links() }}
</section>
“Tailwindifying” the CSS
Right now we have a working solution, and we could call it done. But merely dumping our custom CSS into utilities isn’t exactly Tailwind native, and these styles also belong in the components layer, so let’s fix all that. Note that some of the colours changed slightly so we can use those provided by Tailwind. There are also a few tweaks for alignment, which will show up soon.
@tailwind base;
@tailwind components;
@tailwind utilities;

@layer components {
    /* Mobile first styles, extra small display, single column originally up to 580px */
    /* Now small display: up to 639px */
    ol.collection {
        @apply m-0 p-0;
    }

    li {
        @apply list-none;
    }

    ol.collection * {
        @apply box-border;
    }

    .item {
        @apply border border-gray-500 p-3 rounded-sm;
    }

    /* Don't display the first item, since it is used to display the header for tabular layouts*/
    .collection-container > li:first-child {
        @apply hidden;
    }

    .attribute::before {
        @apply content-[attr(data-name)] text-end pr-3;
    }

    /* Attribute name for first column, and attribute value for second column. */
    .attribute {
        @apply grid grid-cols-[minmax(9em,30%)_1fr];
    }

    .collection-container {
        @apply grid gap-5 grid-cols-1;
    }

    @media (min-width: 640px) {
        /* Mobile first styles, small display, dual column originally 581px to 736px */
        /* Now medium 640px up to 767px */
        .collection-container {
            @apply grid gap-5 grid-cols-2;
        }

    }

    @media (min-width: 768px) {
        /* Mobile first styles, medium display, table originally 737px and up */
        /* Now 768 and up */

        .attribute::before {
            @apply content-none;
        }

        /* Show the first item, since it is used to display the header for tabular layouts*/
        .collection-container > li:first-child {
            @apply grid;
        }

        .item {
            @apply border-0 p-0;
        }

        /* The maximum column width, that can wrap */
        .item-container {
            @apply grid grid-cols-[2em_2em_10fr_2fr_2fr_2fr_2fr_4em_6em];
        }

        .attribute-container {
            @apply grid grid-cols-[repeat(auto-fit,minmax(var(--column-width-min),1fr))];
        }

        /* Definition of wrapping column width for attribute groups. */
        .part-information {
            --column-width-min: 10em;
        }

        .part-id {
            --column-width-min: 10em;
        }

        .vendor-information {
            --column-width-min: 8em;
        }

        .quantity {
            --column-width-min: 5em;
        }

        .cost {
            --column-width-min: 5em;
        }

        .duty {
            --column-width-min: 5em;
        }

        .freight {
            --column-width-min: 5em;
        }

        .collection {
            @apply border-t border-l border-gray-500;
        }

        /* In order to maximize row lines, only display one line for a cell */
        .attribute {
            @apply block border-r border-b border-gray-500 grid-cols-none overflow-hidden p-0.5 text-ellipsis whitespace-nowrap;

        }

        .collection-container > .item-container:first-child {
            @apply bg-orange-200;
        }

        .item-container:hover {
            @apply bg-blue-100;
        }

        .collection-container {
            @apply grid-cols-none gap-0;
        }

        /* Center header labels */
        .collection-container > .item-container:first-child .attribute {
            @apply flex items-center justify-center overflow-auto whitespace-normal;
            text-overflow: initial;
        }
    }
}
While we’re at it, let’s make the card view a little nicer and align the columns in the table view:
<section>
    <x-secondary-button wire:click="populate(10)">Add records</x-secondary-button>
    <x-secondary-button wire:click="purge">Purge All Records</x-secondary-button>
    @if(count($parts))
        <ol class="collection collection-container">
            <!-- The first list item is the header of the table -->
            <li class="item item-container">
                <div class="attribute"></div>
                <div class="attribute" data-name="#">#</div>
                <!-- Enclose semantically similar attributes as a div hierarchy -->
                <div class="attribute-container part-information">
                    <div class="attribute-container part-id">
                        <div class="attribute" data-name="Part Number">Part Number</div>
                        <div class="attribute" data-name="Part Description">Part Description</div>
                    </div>
                    <div class="attribute-container vendor-information">
                        <div class="attribute">Vendor Number</div>
                        <div class="attribute">Vendor Name</div>
                    </div>
                </div>
                <div class="attribute-container quantity">
                    <div class="attribute">Order Qty.</div>
                    <div class="attribute">Receive Qty.</div>
                </div>
                <div class="attribute-container cost">
                    <div class="attribute">Cost</div>
                    <div class="attribute">Extended Cost</div>
                </div>
                <div class="attribute-container duty">
                    <div class="attribute">Duty %</div>
                    <div class="attribute">Duty</div>
                </div>
                <div class="attribute-container freight">
                    <div class="attribute">Freight %</div>
                    <div class="attribute">Freight</div>
                </div>
                <div class="attribute">UOM</div>
                <div class="attribute">Vendor Part#</div>
            </li>
            <!-- The rest of the items in the list are the actual data -->
            @foreach ($parts as $part)
                <li class="item item-container" wire:key="{{ $part->id }}">
                    <div class="attribute md:text-center" data-name="Select"><input type="checkbox" name="" id="{{ $part->id }}"></div>
                    <div class="attribute md:text-center" data-name="#">{{ $loop->index + 1 }}</div>
                    <div class="attribute-container part-information">
                        <div class="attribute-container part-id">
                            <div class="attribute" data-name="Part Number:">{{ $part->partNumber }}</div>
                            <div class="attribute" data-name="Part Description:">{{ $part->partDescription }}</div>
                        </div>
                        <div class="attribute-container vendor-information">
                            <div class="attribute" data-name="Vendor Number:">{{ $part->vendorNumber }}</div>
                            <div class="attribute" data-name="Vendor Name:">{{ $part->vendorName }}</div>
                        </div>
                    </div>
                    <div class="attribute-container quantity">
                        <div class="attribute md:text-end" data-name="Order Qty.:">{{ $part->orderQuantity }}</div>
                        <div class="attribute md:text-end" data-name="Receive Qty.:">{{ $part->receiveQuantity }}</div>
                    </div>
                    <div class="attribute-container cost">
                        <div class="attribute md:text-end" data-name="Cost:">${{ number_format($part->cost, 2) }}</div>
                        <div class="attribute md:text-end" data-name="Extended Cost:">
                            ${{ number_format($part->extendedCost, 2) }}</div>
                    </div>
                    <div class="attribute-container duty">
                        <div class="attribute md:text-end" data-name="Duty %:">{{ number_format($part->dutyPct, 1) }}%</div>
                        <div class="attribute md:text-end" data-name="Duty Amount:">${{ number_format($part->duty, 2) }}</div>
                    </div>
                    <div class="attribute-container freight">
                        <div class="attribute md:text-end" data-name="Freight %:">{{ number_format($part->freightPct, 1) }}%</div>
                        <div class="attribute md:text-end" data-name="Freight Amount:">${{ number_format($part->freight, 2) }}</div>
                    </div>
                    <div class="attribute md:text-center" data-name="UOM:">{{ $part->uom }}</div>
                    <div class="attribute" data-name="Vendor Part#:">{{ $part->vendorPart }}</div>
                </li>
            @endforeach
        </ol>
    @else
        <p>There are no parts in the table.</p>
    @endif
    {{ $parts->links() }}
</section>
All Done
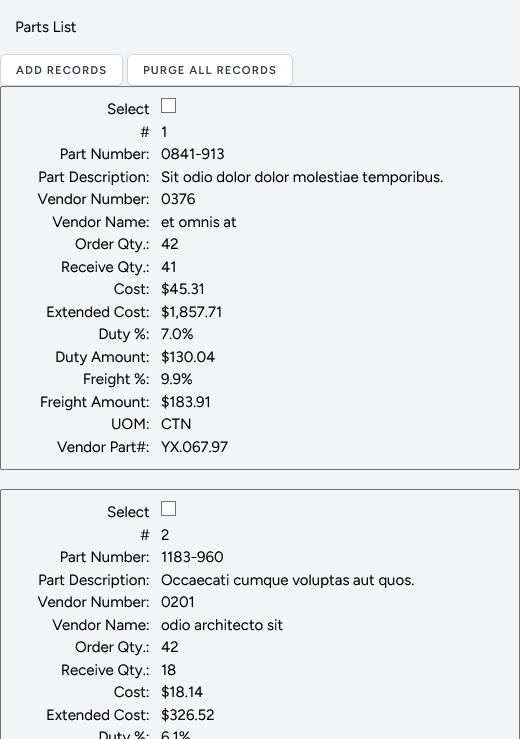
Let’s look at the results! First the card view.
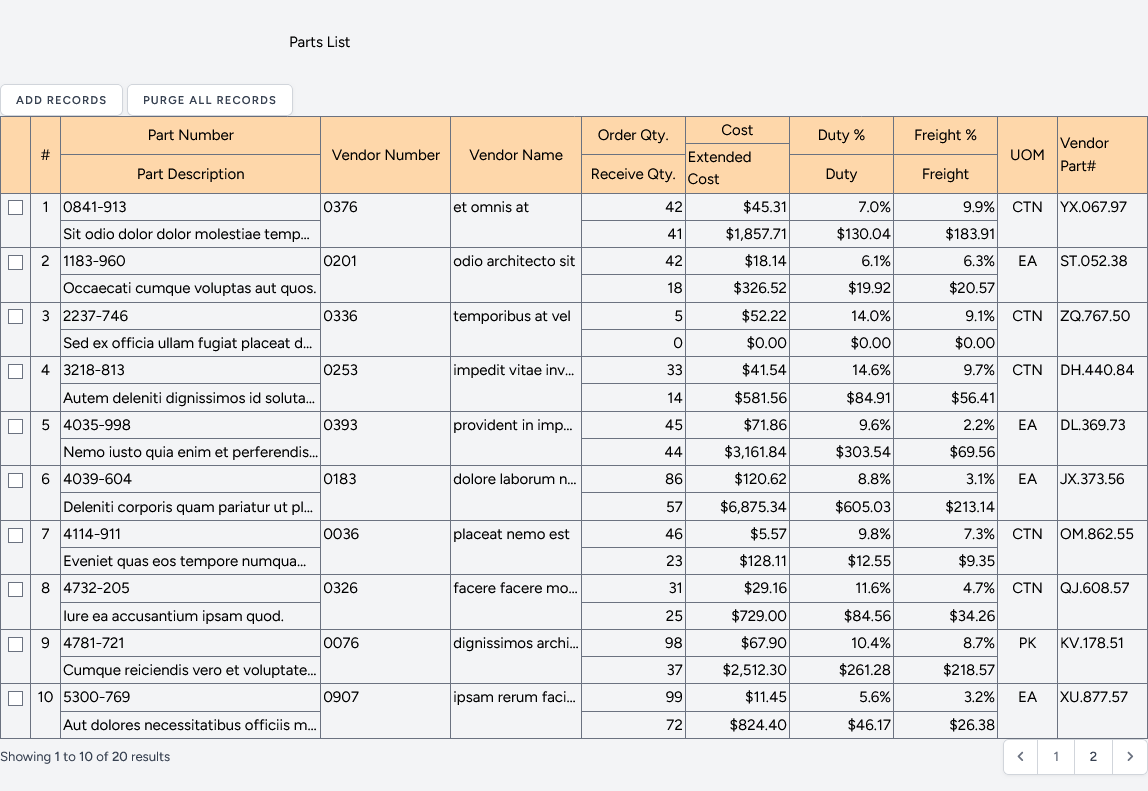
And the table view:
There’s more that could be done here. For example, some of these constructs could be generalized to make it easier to support multiple tables. If your application has a lot of different tables, that would be the best approach.

Recent Comments